Zoom OAuth: How to Connect Your Web App to the Zoom Client
Most websites today offer a number of popular social login providers like Google, Facebook, LinkedIn, etc. They also interact with these providers in other ways, such as sharing a post on your behalf on Facebook, accessing your Google Calendar, etc. In all these scenarios, the web app needs to authenticate you via these third-party providers. It does so using a secure protocol called open authentication (OAuth).
So, what if your web app wants to access a user's Zoom meetings? Well, in that case, you can integrate the Zoom API into your app.
However, you first need to connect your web app to the Zoom client via Zoom OAuth. In this post, we'll see step by step how to integrate Zoom OAuth into your Node.js app.
Is There an API for Zoom?
Zoom provides an API that you can use to access your user's recorded videos, their Zoom chats, etc. It also provides a webhook that can run every time a user records a new Zoom meeting. There are tons of integrations and applications built on top of the Zoom workflow, and they use different Zoom API endpoints.
Depending on how you want to use Zoom in your application, you can use their API endpoints accordingly. For instance, if you want to list, delete, or update a Zoom cloud recording, you can use the endpoints listed here.
Similarly, if you want to list all the users, update a user's settings, or list a user's Zoom schedule calendar, you can use the endpoints mentioned here.
However, in order to use any Zoom API, you need to first integrate Zoom OAuth into your application.
What Is Zoom OAuth?
Any third-party API requires authentication. You must have seen how some external APIs require you to have an authentication token sent in their headers with every request. This is how they verify that it's a legitimate and authentic API request.
OAuth is also a method of authenticating HTTP requests. Instead of generating an authentication token and sending it along with every request, you use the API provider itself to authenticate and authorize the user.
In that case, the API provider is Zoom, so you can use Zoom OAuth to authenticate the user. This means that the first step a user does is authenticating your app via their Zoom account. Once they've done that, you can now let them access any of Zoom's APIs to retrieve any information you want.
Zoom OAuth Setup
To setup Zoom OAuth so that we can later use it in a Node.js application, we need to do the following:
- Visit https://marketplace.zoom.us and login/sign up with your Zoom account.
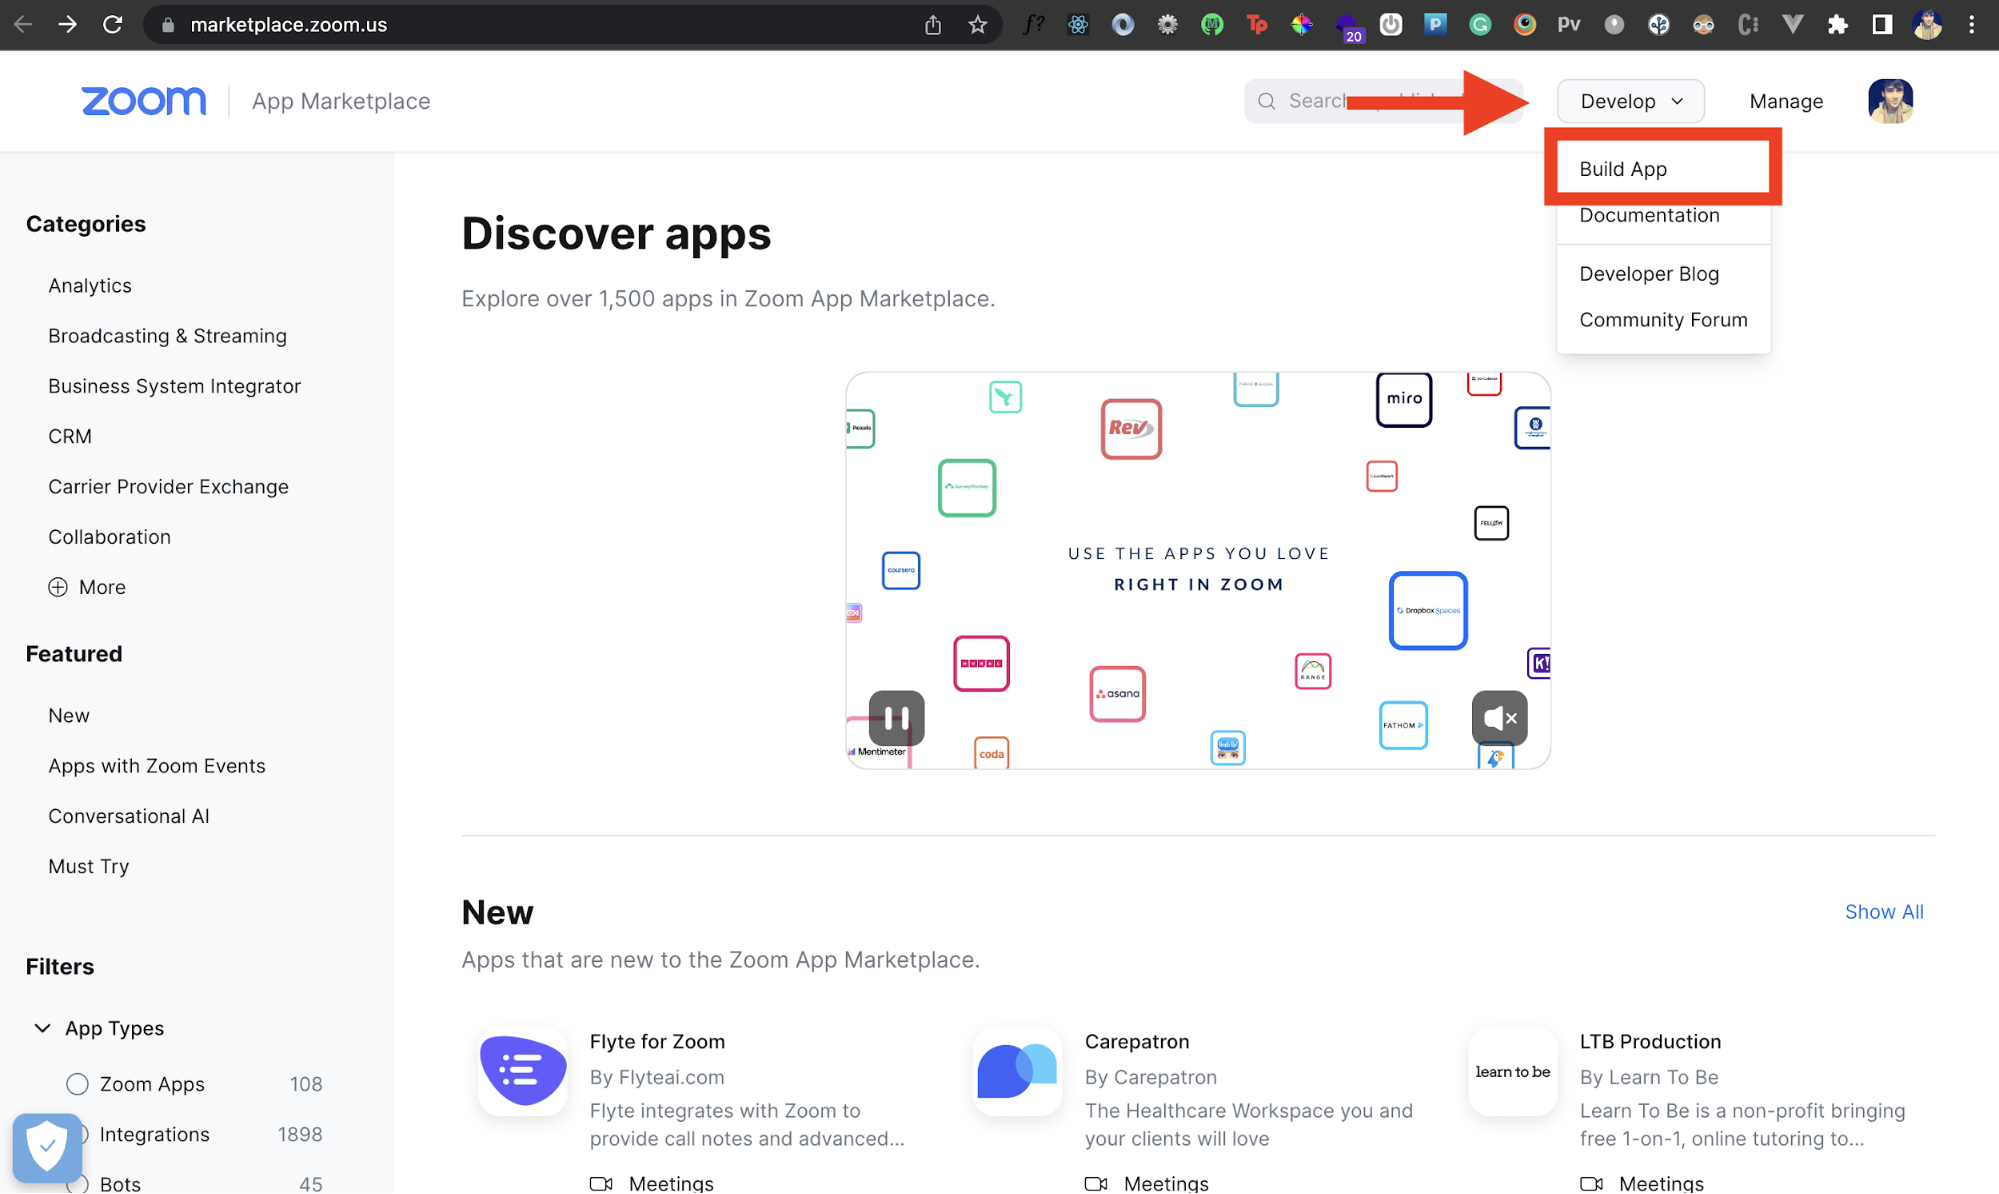
- Click on Develop.
- Click on Build App.
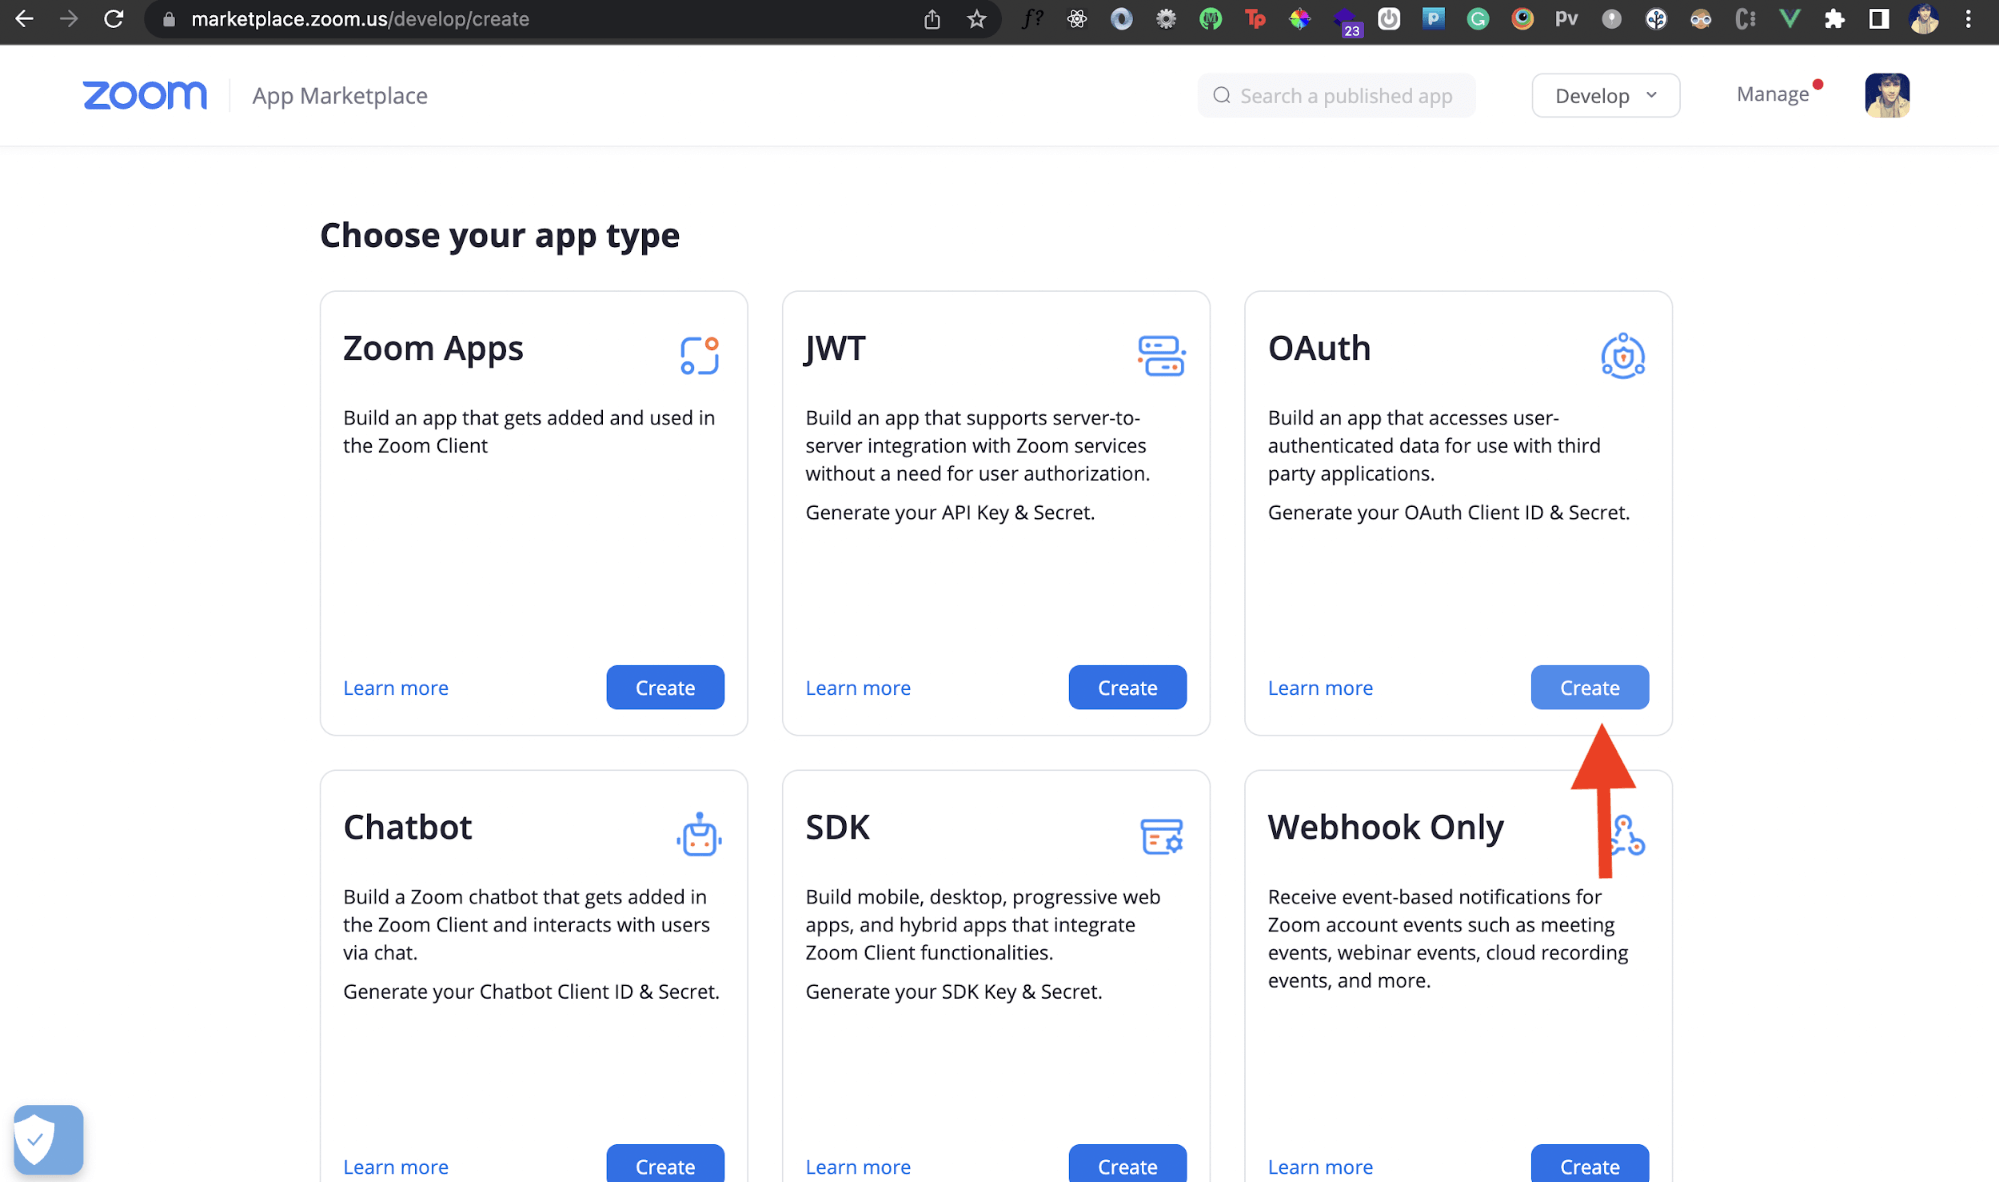
We're going to build a Zoom Marketplace app that gives us some credentials that we'll use later on in our application. It should land you on the following page. Since we wish to use OAuth, choose OAuth as the app type and select Create.
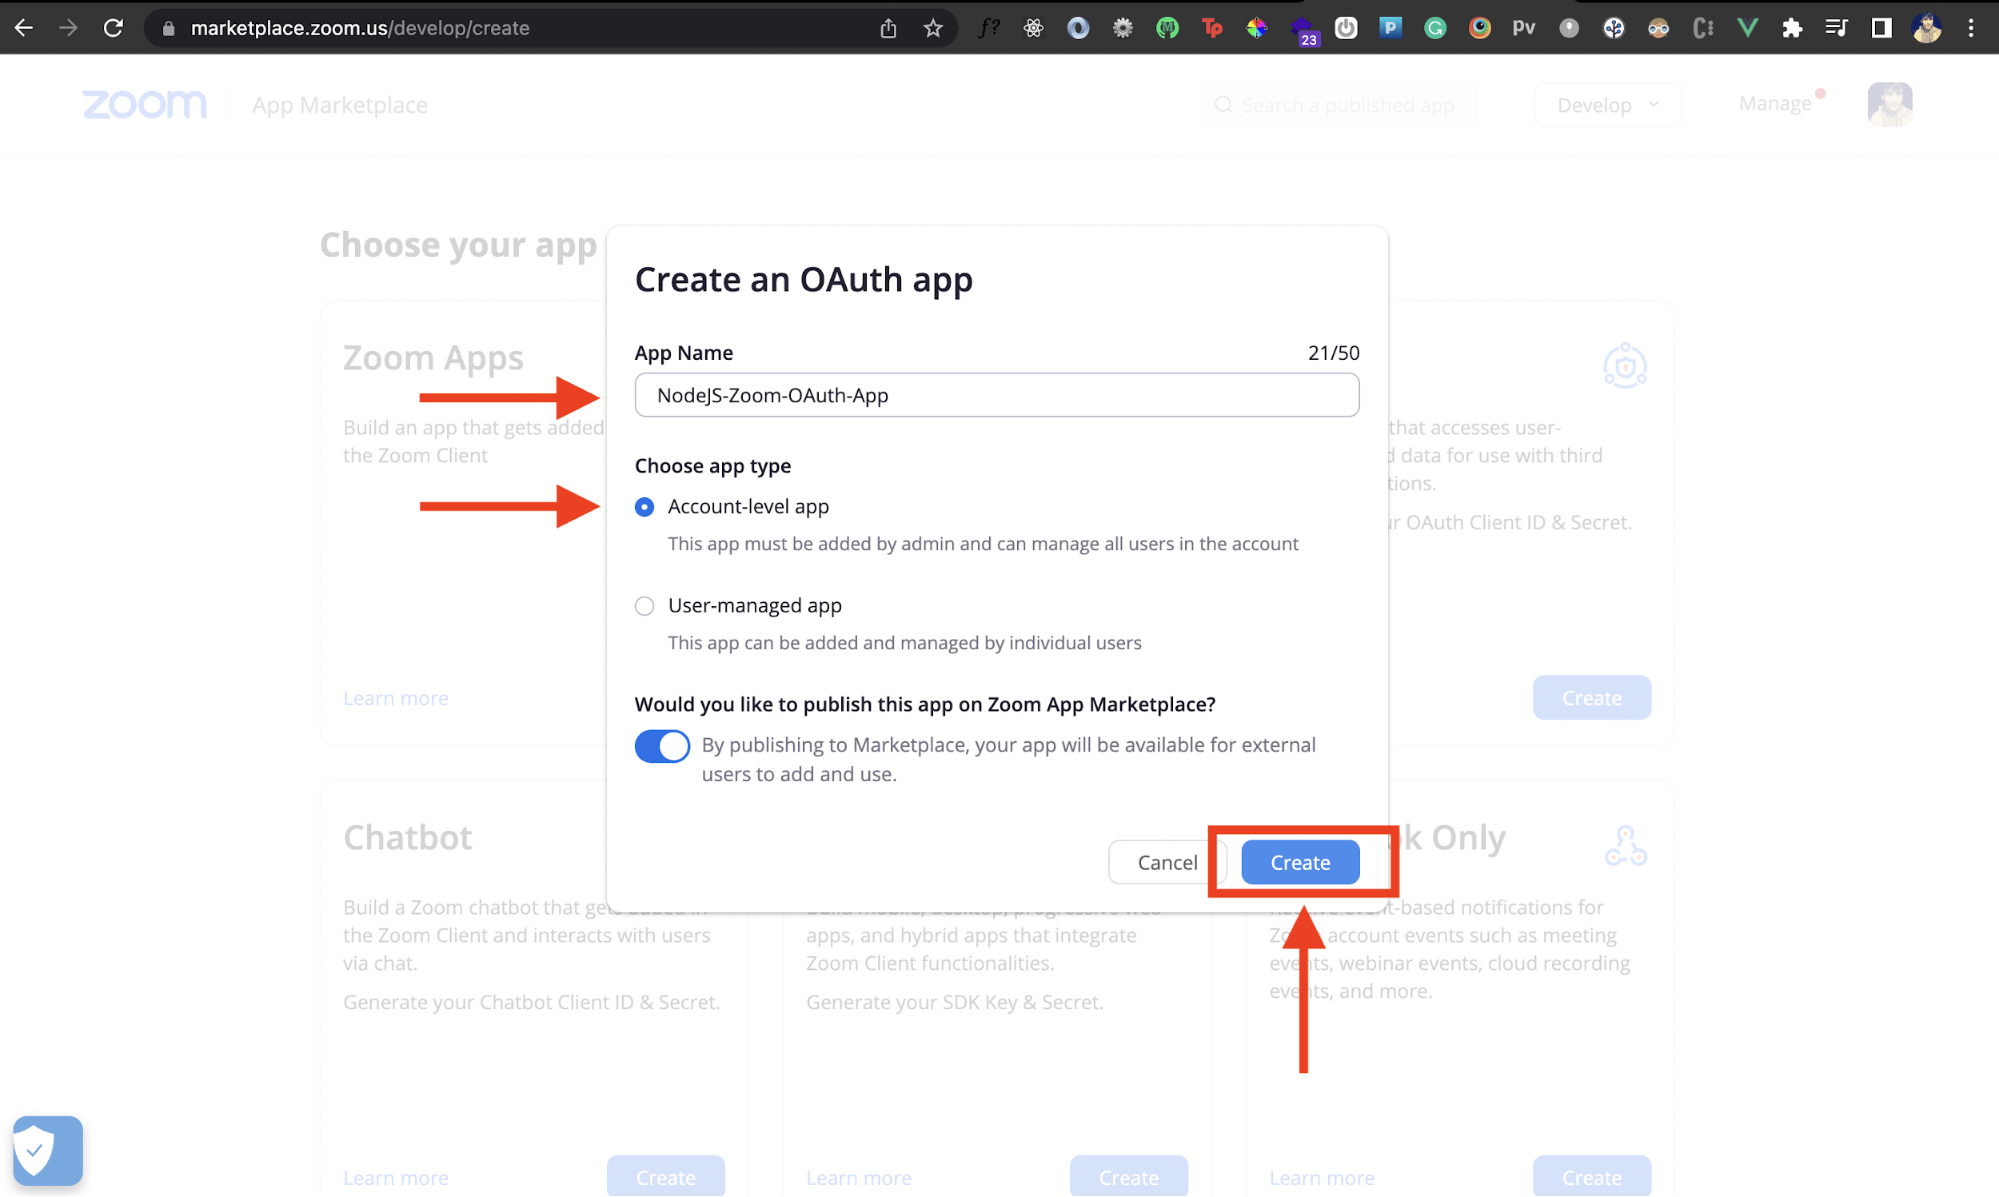
Then we'll need to enter some details for our Zoom Marketplace app. Enter the name of your Zoom app. Choose the app type as Account-level app. Then hit the Create button.
Once you do that, a new Zoom app will be created for you. Awesome!
Get Zoom App Credentials
After you create a Zoom app, if you head inside it, you'll see the following page:
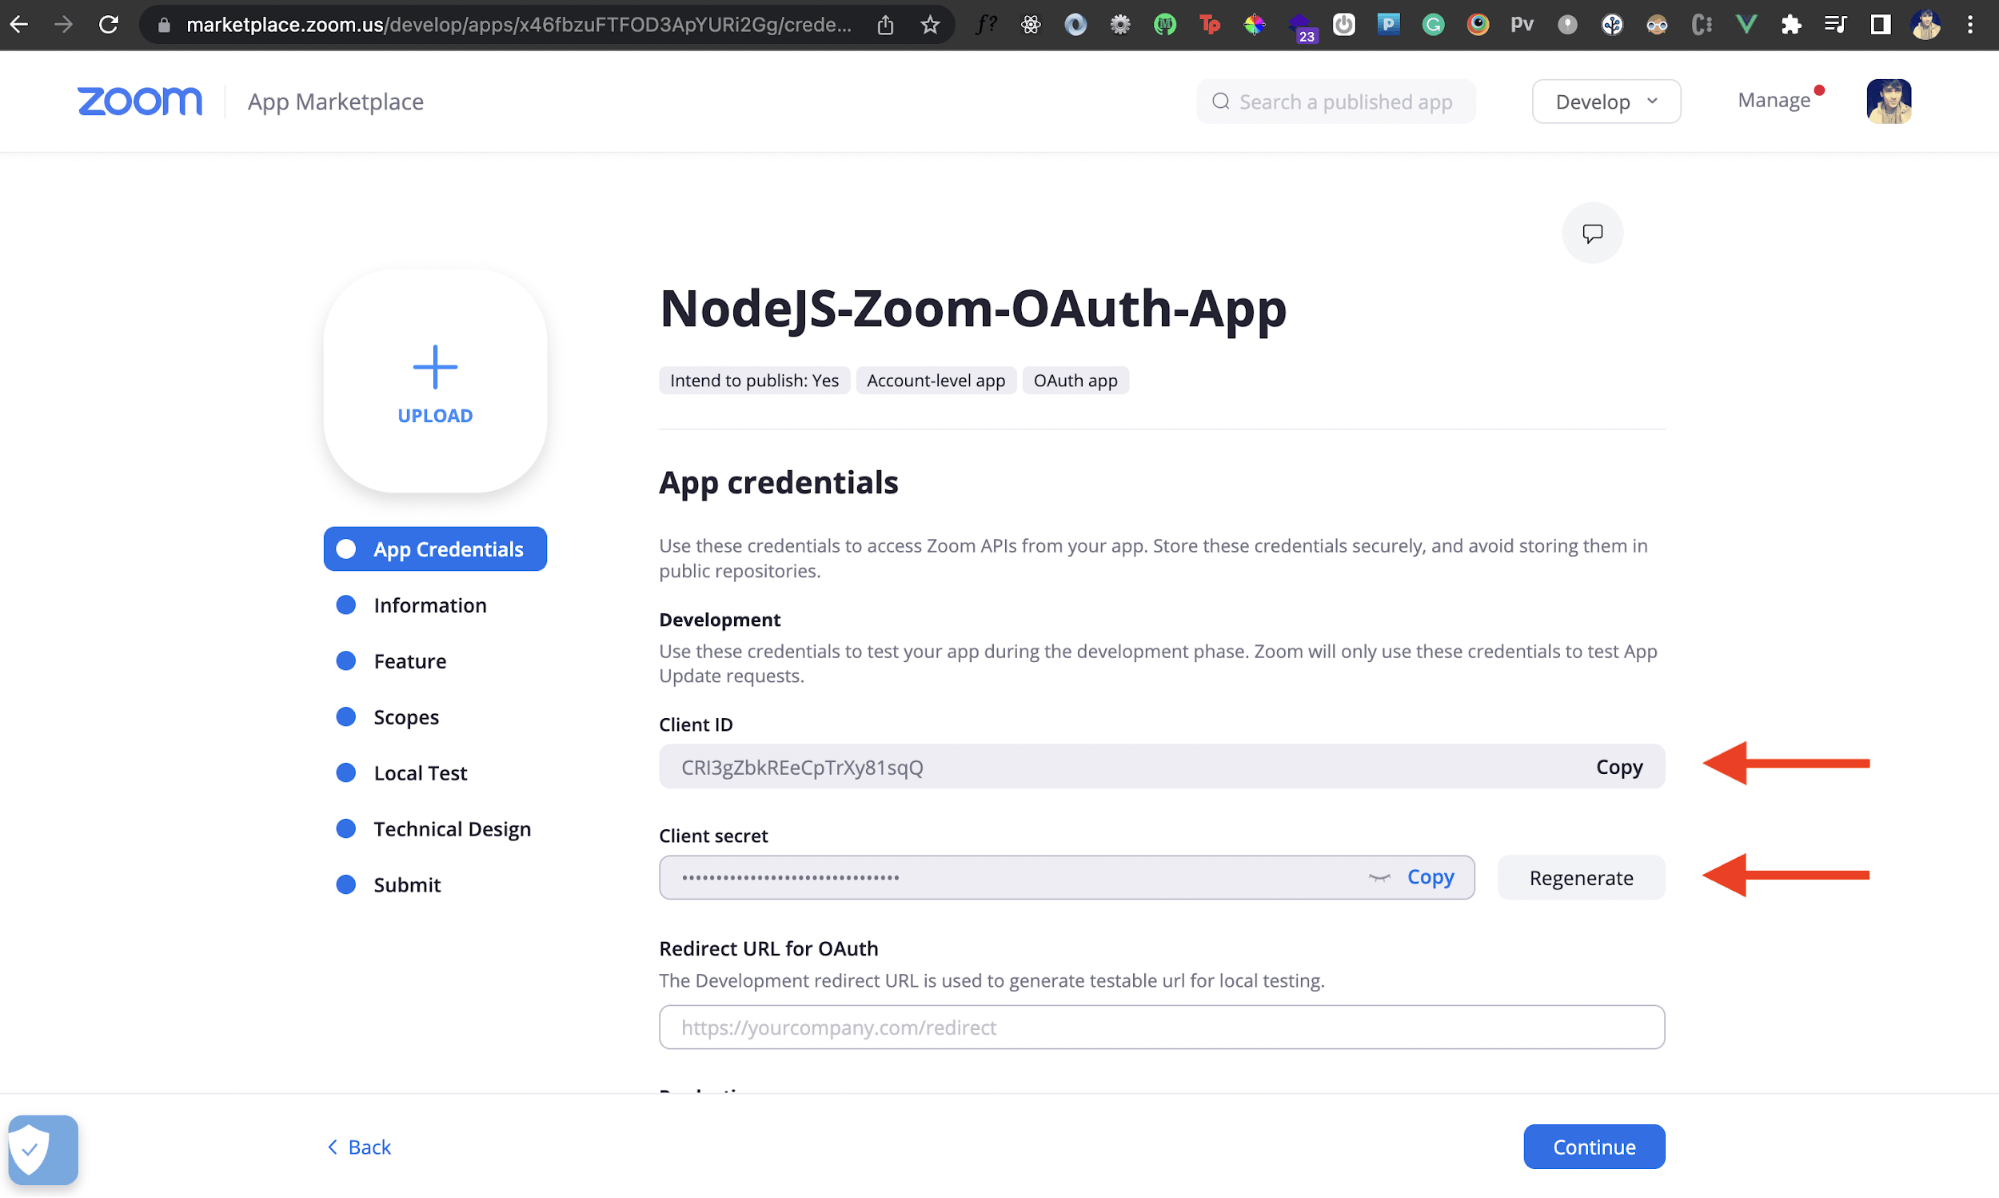
We'll need the Client ID and Client secret of our Zoom app. You'll find these inside the App Credentials page. Copy these details and store them somewhere. Notice that right underneath these fields is a Redirect URL field. We'll update this later on.
Add Zoom OAuth to a Node.js App
Now let's see how we can integrate Zoom OAuth into a Node.js application.
Project Setup
We'll first create a new Node.js project. Inside the directory of your choice, run the following command:
mkdir nodejs-zoom-oauth-app && cd nodejs-zoom-oauth-app && npm init -y
This will create a new Node.js project inside the directory nodejs-zoom-oauth-app. Once that's done, we'll install some dependencies:
npm i express dotenv request
We'll use Express to create a server. To import our Client ID and Client Secret that we obtained previously into our application in a secure manner, we'll store them in a .env file. To communicate with the Zoom API from our Node.js app using HTTP requests, we'll use the request package.
Create a file called .env in the root directory with the following code:
clientID=CRI3gZbkREeCpTrXy81sqQ
clientSecret=
redirectURL=
Add your own Client ID and Client Secret into the above values. Leave the redirectURL part blank, since we'll come back to it later.
After that, create a file called app.js in the root directory. This is where we'll write all of our code.
Create an Express Server
We'll now import all the above-installed packages. Then we'll listen to any requests on port 8000. The following code creates a simple Express server that runs on http://localhost:8000.
require('dotenv/config')
const request = require('request')
// Create an express app
const express = require('express')
const app = express()
// CONSTANTS
const PORT = 8000
//Root URL /
app.get('/', (req, res) => {})
//Kickstart express server on designated port
app.listen(8000, () =>
    console.log(`Zoom OAuth NodeJS App started on port ${PORT}`)
)
Add the Redirect URL
The next step is to check if the user is authenticated or not. But before that, we'll need to set up a redirect URL. We saw earlier that our Zoom app needs a redirect URL in the App Credentials section. This is the URL that our Zoom app will redirect to once a user is authenticated. However, we can't use localhost or HTTP URLs as redirect URLs.
In a production app, the redirect URL will simply be the domain on which your app is hosted. However, for development purposes, we can use a tunnel URL that maps back to our localhost. For this, we'll use ngrok. Let's first start our Express server by running the following command in the root directory:
nodemon app.js
You should get the following message in the console:

Great! Now, let's tunnel our localhost URL on port 8000 using ngrok:
nrok http 8000
This should give you two tunnel URLs. We're only interested in the one that is https instead of http.

Now we can use https://86f8-27-4-237-19.ngrok.io as our redirect URL. Go back to your .env file and add this next to the redirectURL field.
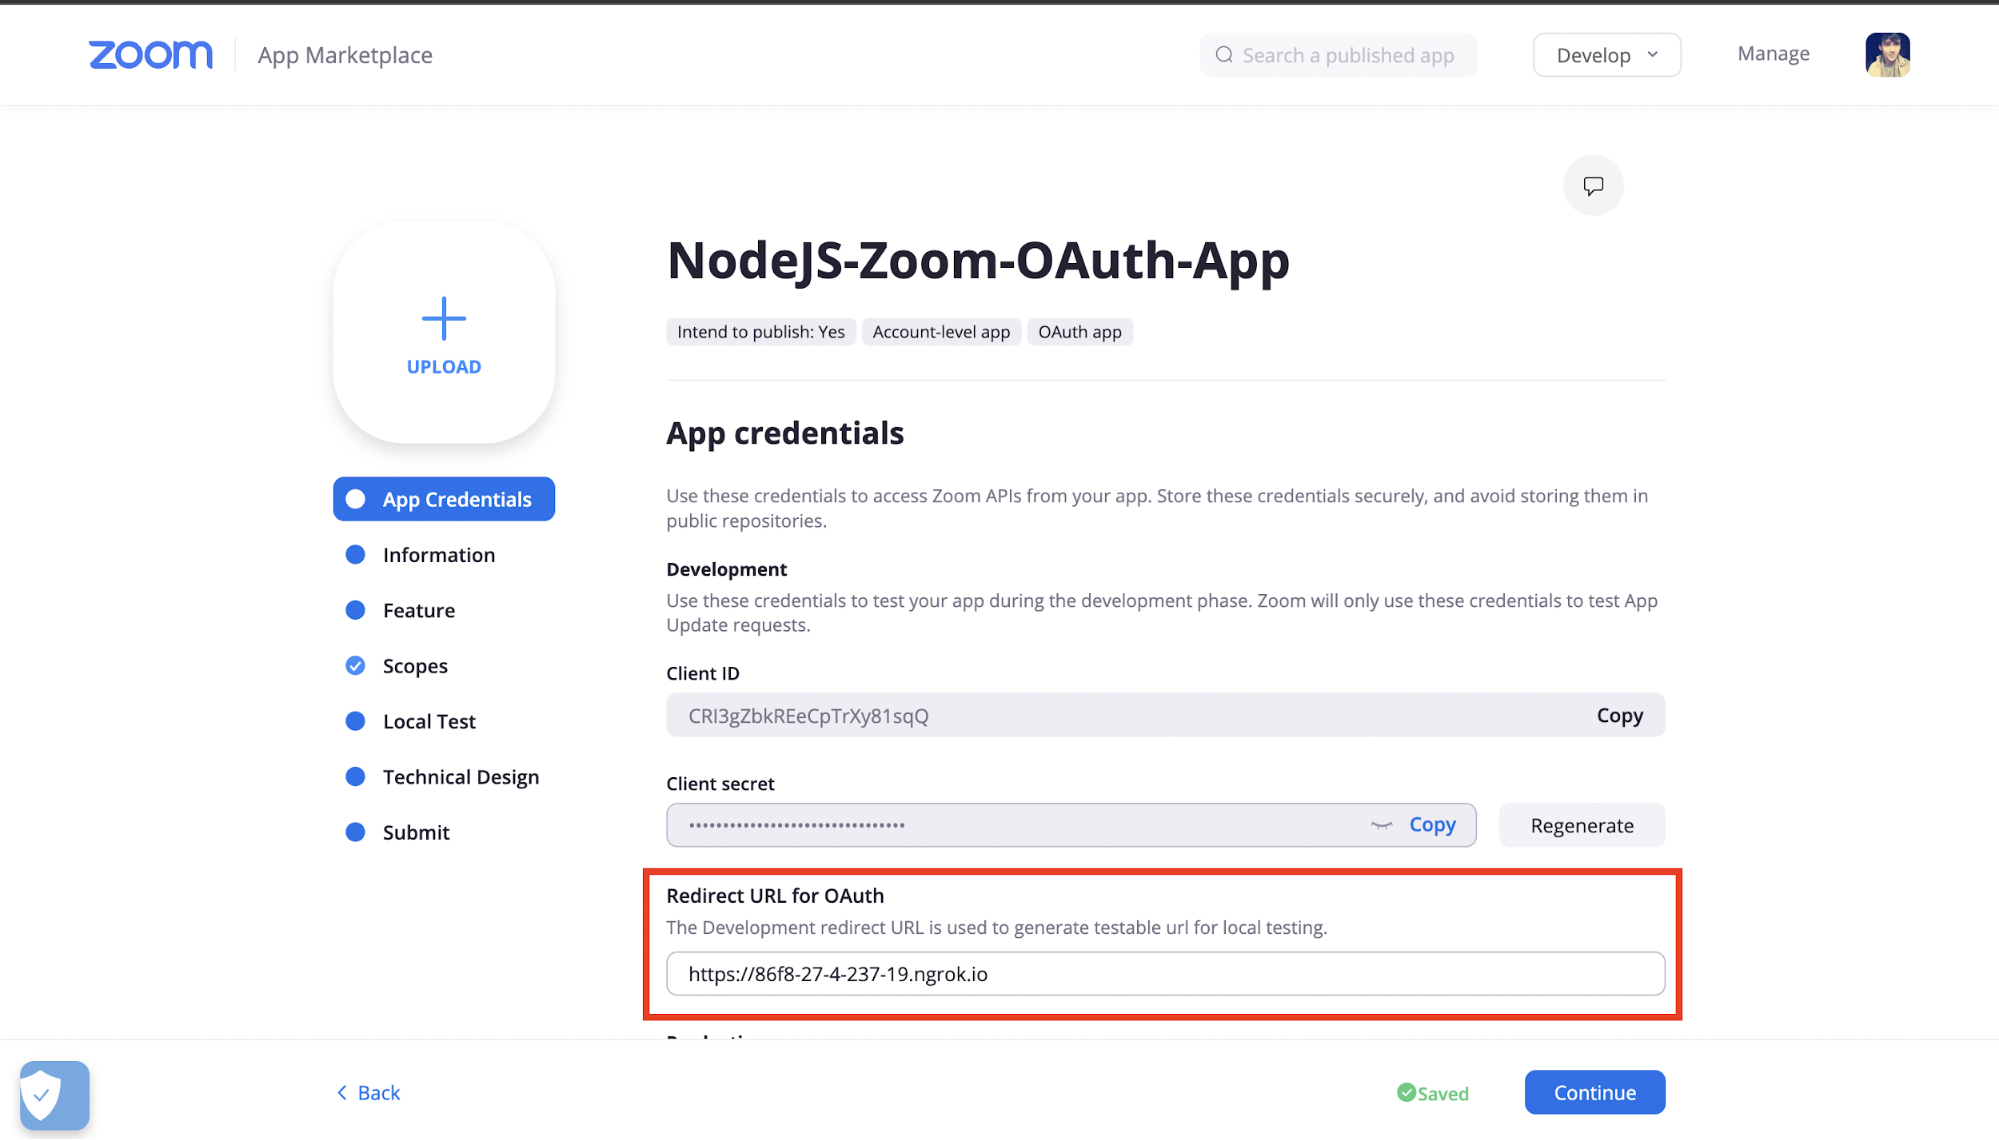
We'll also need to add this as our whitelist URL in the Zoom App Credentials page.
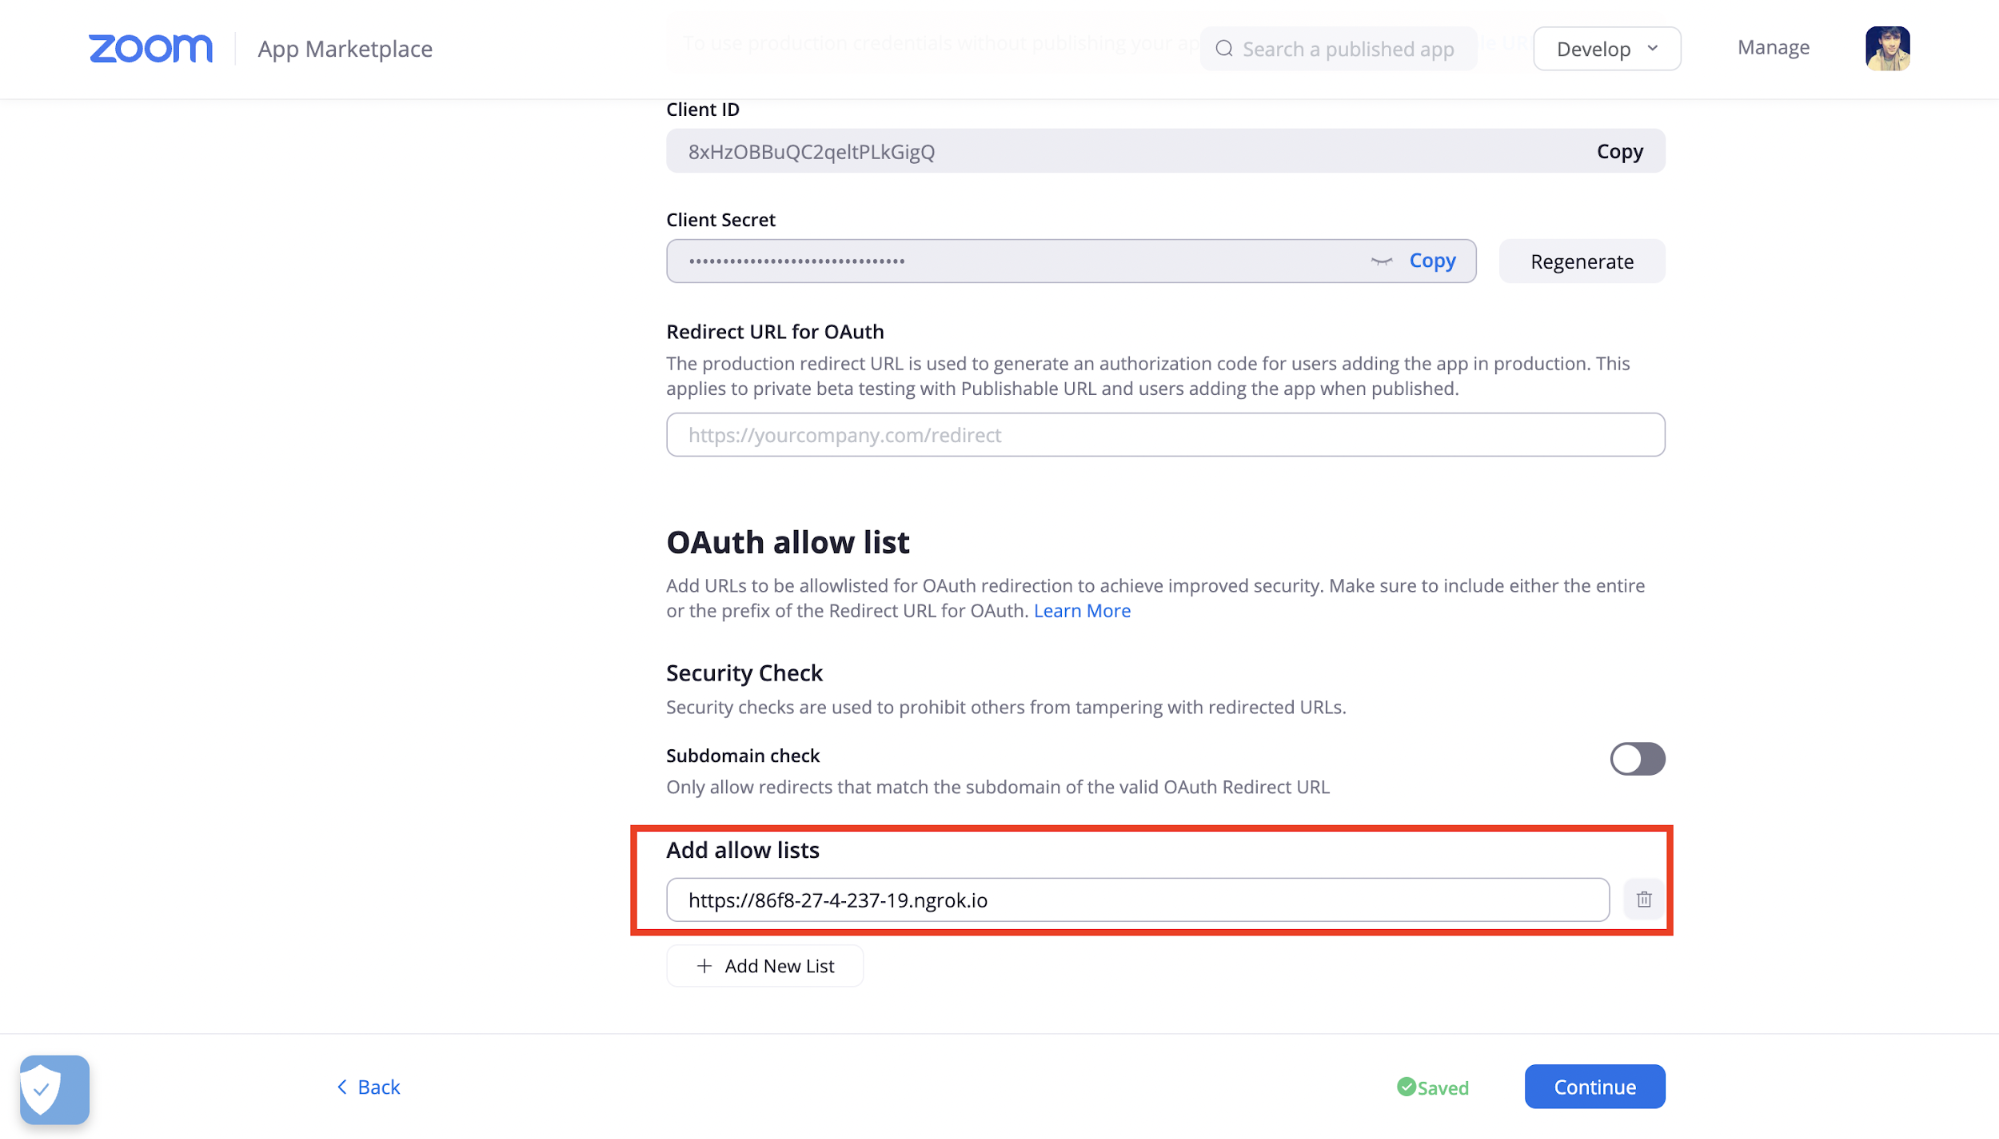
Awesome! Let's now invoke Zoom OAuth and authenticate our users via our Node.js app.
Invoke Zoom OAuth
We'll use the endpoint https://zoom.us/oauth/token?grant_type=authorization_code&code= to get the authentication components like access tokens, refresh tokens, etc. We'll next use the URL https://zoom.us/oauth/authorize?response_type=code&client_id= to do the OAuth. Let's add them as constants in our app.js file:
// CONSTANTS
const ZOOM_GET_AUTHCODE =
    'https://zoom.us/oauth/token?grant_type=authorization_code&code='
const ZOOM_AUTH =
    'https://zoom.us/oauth/authorize?response_type=code&client_id='
Now, when we visit the / URL, we'll check if an authentication code (or auth code) exists. This will happen only if the users have authenticated in our app. If they haven't, we'll redirect them to the ZOOM_AUTH URL that we have above.
//Root URL /
app.get('/', (req, res) => {
    /*
        If the code (auth code) property exists in req.query object,
        user is redirected from Zoom OAuth. If not, then redirect to Zoom for OAuth
    */
    const authCode = req.query.code
    if (authCode) {
        return
    }
    // If no auth code is obtained, redirect to Zoom OAuth to do authentication
    res.redirect(
        ZOOM_AUTH +
            process.env.clientID +
            '&redirect_uri=' +
            process.env.redirectURL
    )
})
Now let's visit http://localhost:8000 to see the Zoom OAuth in action:
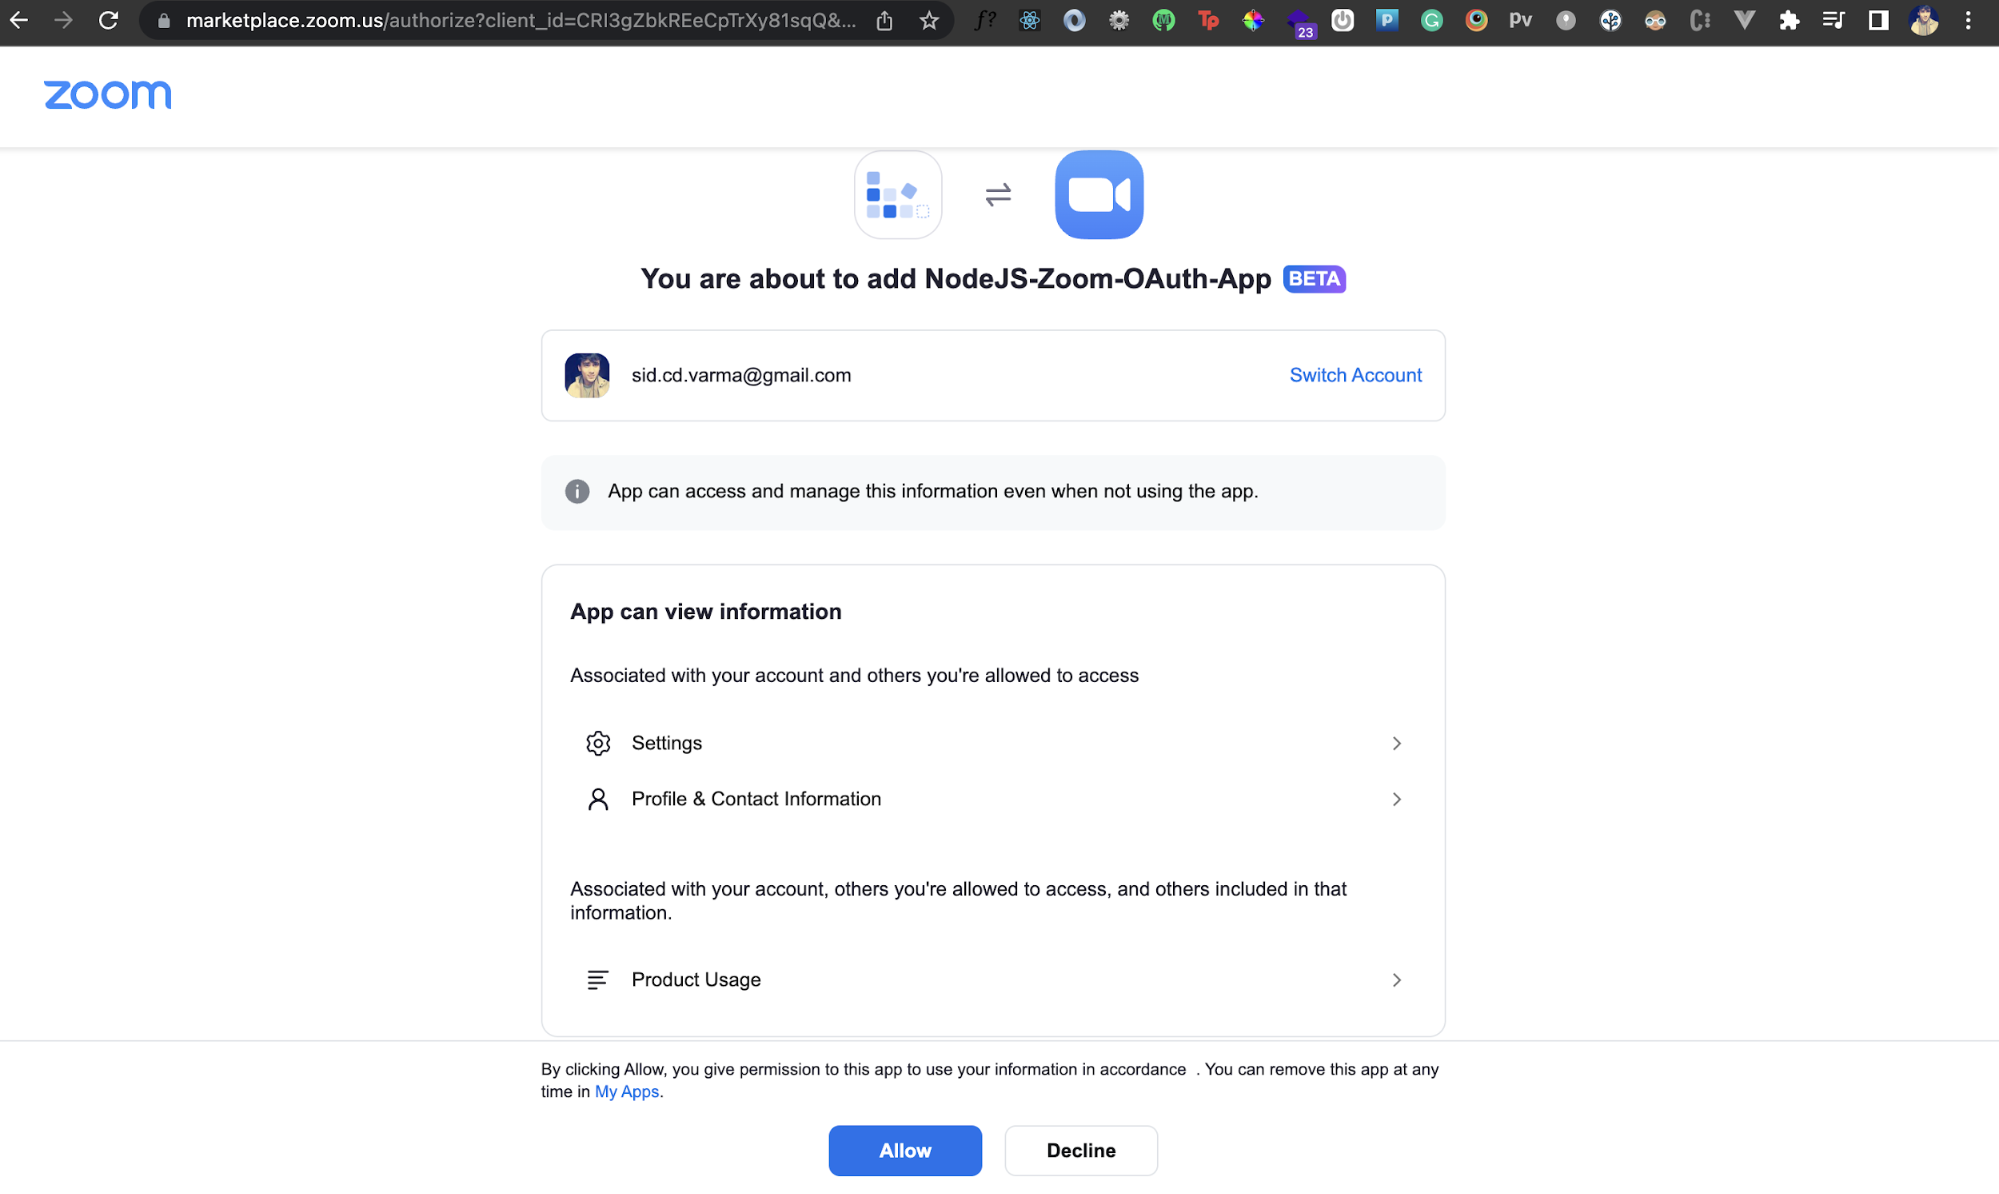
Great! Right now, if you click on the Allow button, the authentication will go through. However, nothing else happens. At this point, we can grab the access token after authentication and invoke one of Zoom's API endpoints.
How Do I Get the Access Tokens in Zoom?
After authentication, we'll receive a code property in the req.query object. This represents the authentication code after Zoom OAuth. We can check if this authCode exists, and make a POST request to the ZOOM_AUTHCODE URL that we defined earlier. In the body of the response, we'll get the access and refresh tokens that we can further use to hit some other Zoom API endpoint.
Here's the code that does the above inside the / handler:
//Root URL /
app.get('/', (req, res) => {
    /*
        If the code (auth code) property exists in req.query object,
        user is redirected from Zoom OAuth. If not, then redirect to Zoom for OAuth
    */
    const authCode=req.query.code;
    if (authCode) {
        // Request an access token using the auth code
        let url =  ZOOM_GET_AUTHCODE + authCode + '&redirect_uri=' + process.env.redirectURL;
        request.post(url, (error, response, body) => {
            // Parse response to JSON
            body = JSON.parse(body);
            const accessToken = body.access_token;
            const refreshToken = body.refresh_token;
            // Obtained access and refresh tokens
            console.log(`Zoom OAuth Access Token: ${accessToken}`);
            console.log(`Zoom OAuth Refresh Token: ${refreshToken}`);
            if(accessToken)
        }).auth(process.env.clientID, process.env.clientSecret);
        return;
    }
    // If no auth code is obtained, redirect to Zoom OAuth to do authentication
    res.redirect(ZOOM_AUTH + process.env.clientID + '&redirect_uri=' + process.env.redirectURL)
})
Now, notice that after authentication, we get these values logged on our console:

Great! Let's now get some user information using these tokens.
Get Authenticated User Information from the Zoom API
Once we have the accessToken, we can make a GET request to https://api.zoom.us/v2/users/me endpoint. This will get us the information about the user who is currently authenticated via Zoom OAuth. Here's the code that makes this request and returns us the response rendered on the page:
if (accessToken)
    // Use the obtained access token to authenticate API calls
    // Send a request to get your user information using the /me endpoint
    // The `/me` context restricts an API call to the user the token belongs to
    // This helps make calls to user-specific endpoints instead of storing the userID
    request
        .get('https://api.zoom.us/v2/users/me', (error, response, body) => {
            if (error) {
                console.log('API Response Error: ', error)
            } else {
                body = JSON.parse(body)
                var JSONResponse =
                    '<pre><code>' +
                    JSON.stringify(body, null, 2) +
                    '</code></pre>'
                res.send(`
                    <style>
                        @import url('https://fonts.googleapis.com/css?family=Open+Sans:400,600&display=swap');@import url('https://necolas.github.io/normalize.css/8.0.1/normalize.css');html {color: #232333;font-family: 'Open Sans', Helvetica, Arial, sans-serif;-webkit-font-smoothing: antialiased;-moz-osx-font-smoothing: grayscale;}h2 {font-weight: 700;font-size: 24px;}h4 {font-weight: 600;font-size: 14px;}.container {margin: 24px auto;padding: 16px;max-width: 720px;}.info {display: flex;align-items: center;}.info>div>span, .info>div>p {font-weight: 400;font-size: 13px;color: #747487;line-height: 16px;}.info>div>span::before {content: "👋";}.info>div>h2 {padding: 8px 0 6px;margin: 0;}.info>div>p {padding: 0;margin: 0;}.info>img {background: #747487;height: 96px;width: 96px;border-radius: 31.68px;overflow: hidden;margin: 0 20px 0 0;}.response {margin: 32px 0;display: flex;flex-wrap: wrap;align-items: center;justify-content: space-between;}.response>a {text-decoration: none;color: #2D8CFF;font-size: 14px;}.response>pre {overflow-x: scroll;background: #f6f7f9;padding: 1.2em 1.4em;border-radius: 10.56px;width: 100%;box-sizing: border-box;}
                    </style>
                    <div className="container">
                        <div className="info">
                            <img src="${body.pic_url}" alt="User photo" />
                            <div>
                                <h2>${body.first_name} ${body.last_name}</h2>
                            </div>
                        </div>
                        <div className="response">
                            User API Response
                            ${JSONResponse}
                        </div>
                    </div>
                `)
            }
        })
        .auth(null, null, true, body.access_token)
else res.send('Something went wrong')
Now if you go back and complete the auth, you should see some information rendered on the page like this:
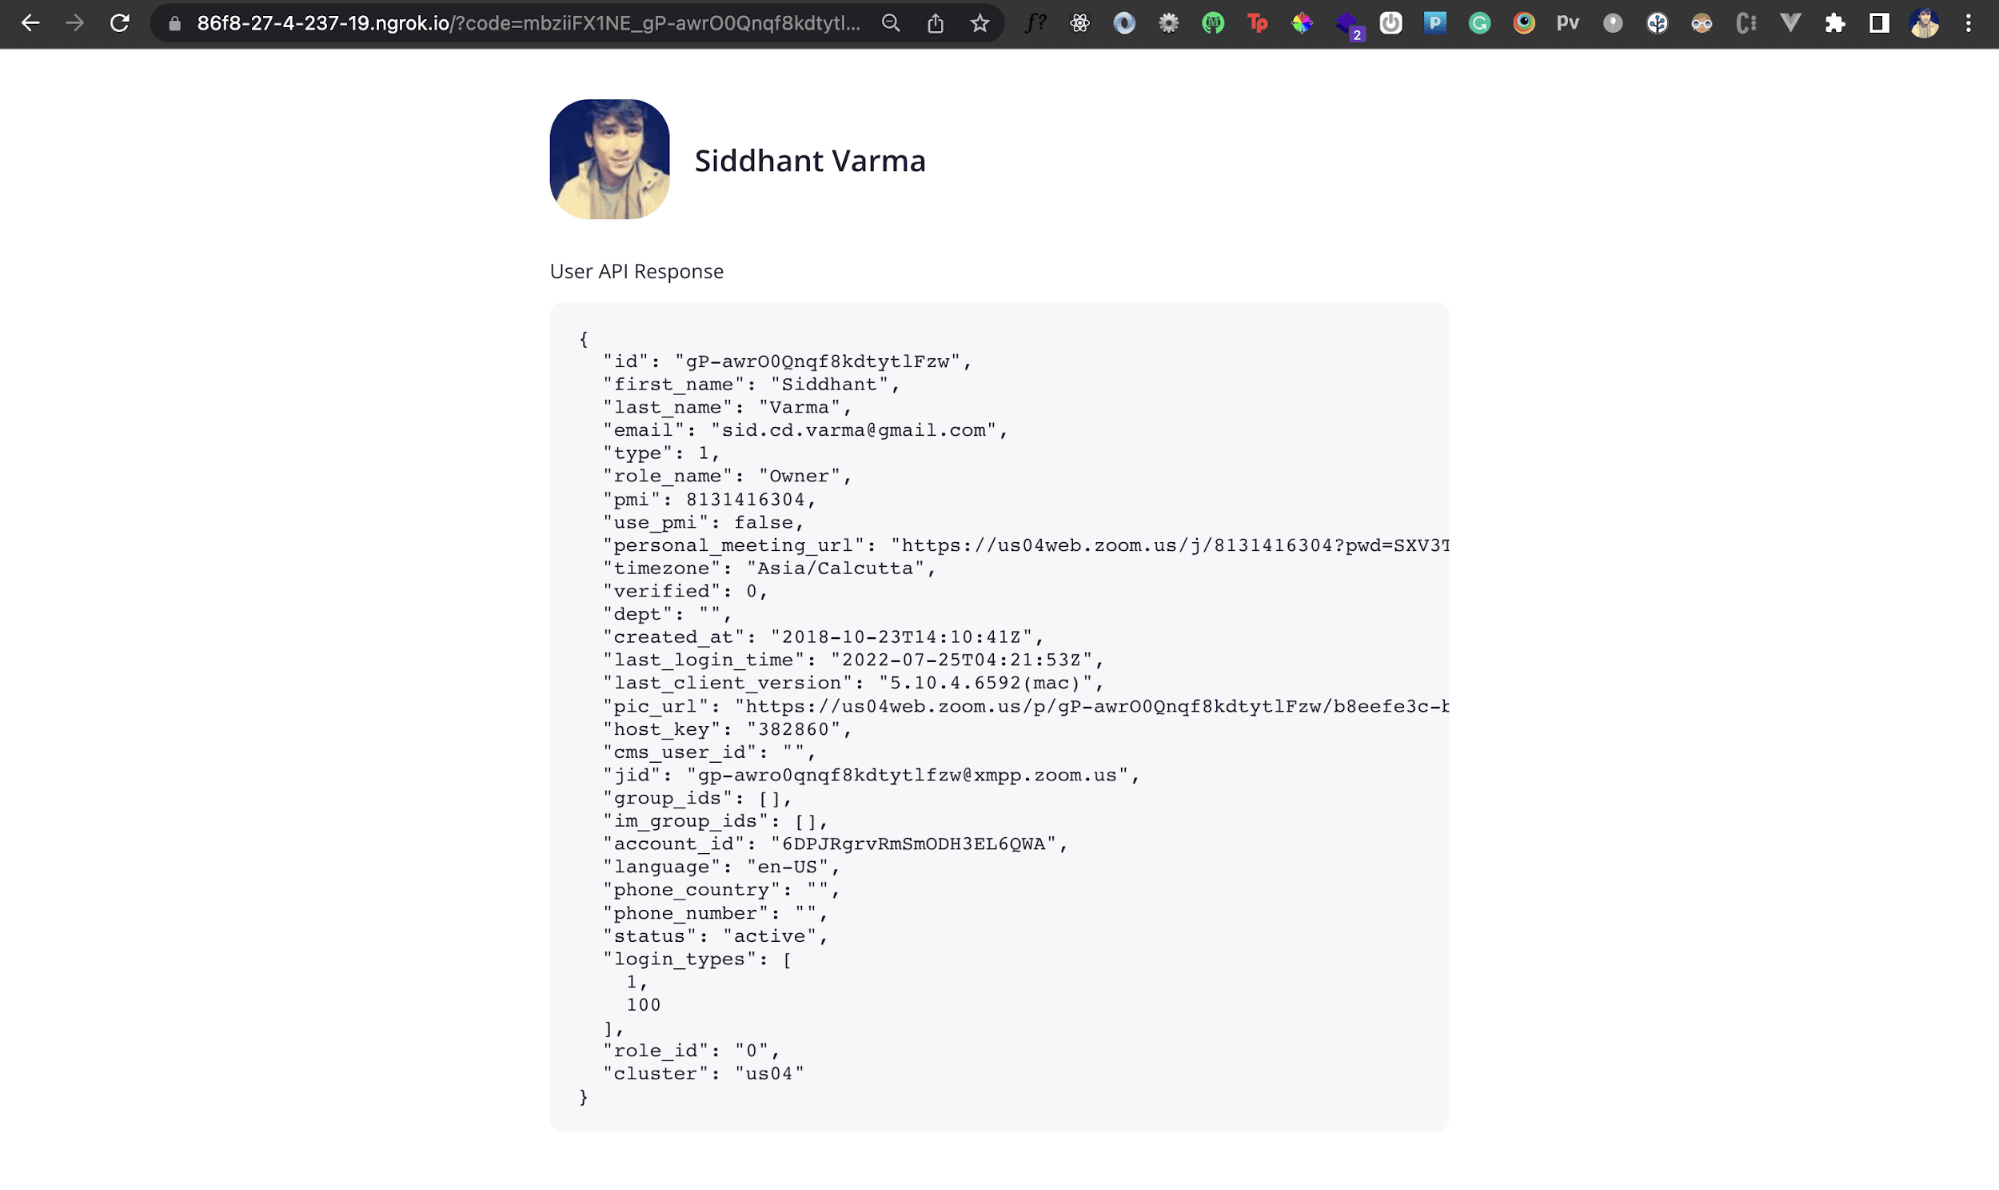
Great! We've now connected our Node.js app to the Zoom client, and in a similar way, we can communicate with other Zoom API endpoints as required.
Conclusion
You've seen how to connect a Node.js app to the Zoom client. Now you can use Zoom OAuth to build any kind of integration you need for your application. You can also refer to the entire code for this tutorial here.
To stay updated with our latest content, please subscribe to our email updates or follow us on Twitter at @runmedev! Also, check out Runme (interactive runbooks for VS Code), and Runme Cloud.Let us know what you think. Bye for now! 👋
This post was written by Siddhant Varma. Siddhant is a full stack JavaScript developer with expertise in frontend engineering. He’s worked with scaling multiple startups in India and has experience building products in the Ed-Tech and healthcare industries. Siddhant has a passion for teaching and a knack for writing. He's also taught programming to many graduates, helping them become better future developers.
